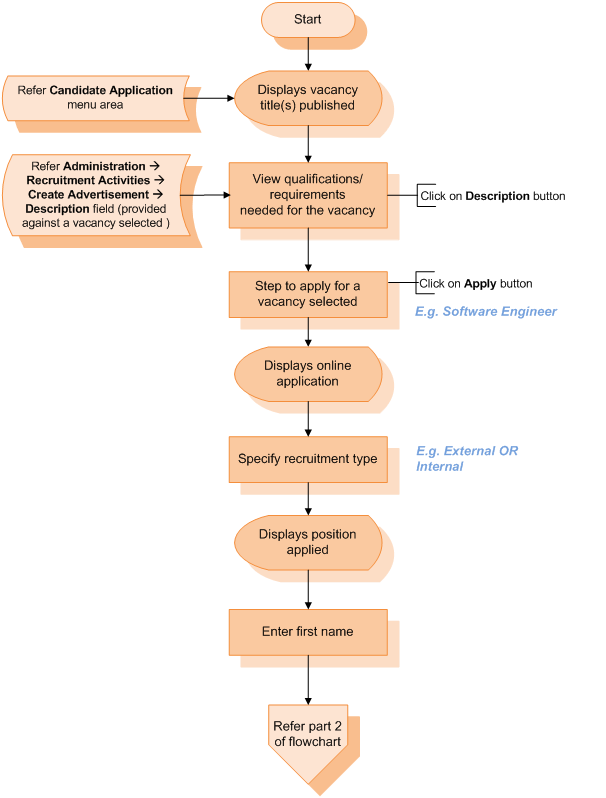
Process of applying for a vacancy is simplified and depicted in the following flowchart.

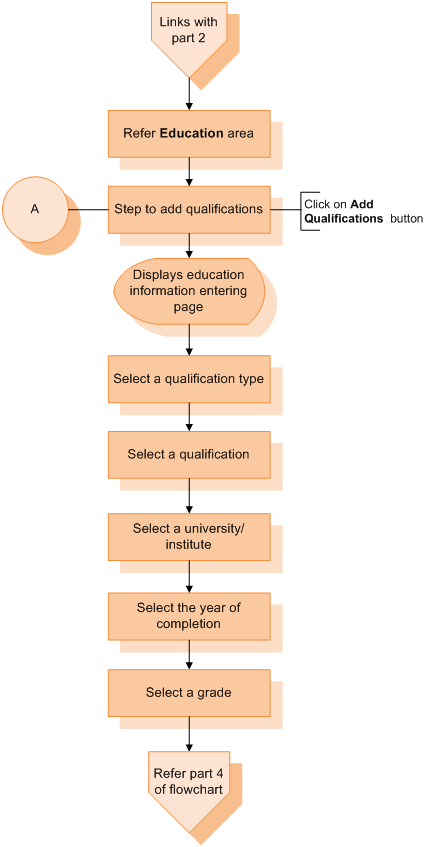
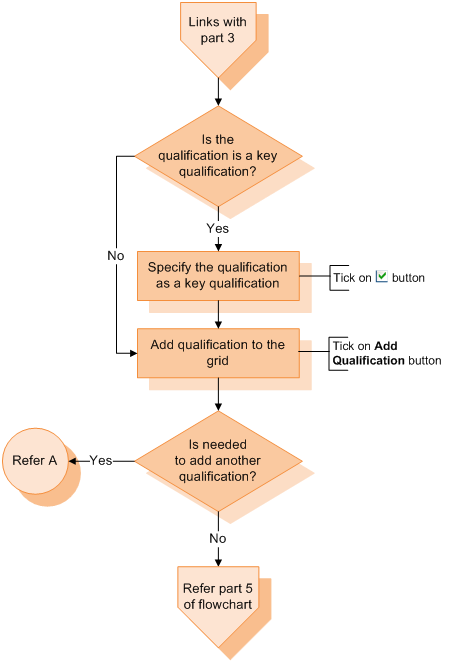


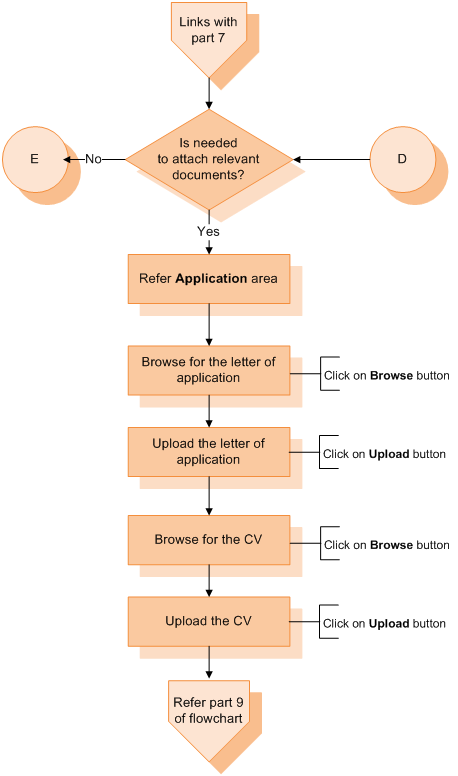

Figure 1.1: Flowchart for the Process of Applying for a Vacancy
According to the flowchart, the steps below should be followed to successfully apply for a vacancy.
1. Navigate the menu path of Recruitment Module à Candidate Applications à Apply for a Vacancy.
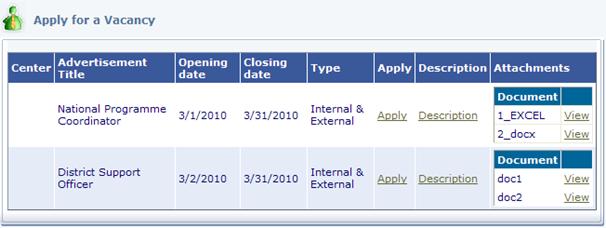
The page loaded displays the positions advertised at Recruitment Module à Administration à Recruitment Activities à Create Advertisement (Refer Screen 1 below).
2. Specify a recruitment type.
If the applicant is an external person, tick on ‘external’ radio button.
If the applicant is an internal employee, tick on ‘internal’ radio button.
(this activity is necessary to do if the recruitment type specified against the respective designation requested as ‘Both’ in the Recruitment Module à Administration à Recruitment Activities à Crate Requisition page à recruitment type field).
3. You can see the qualifications and other requirements expected by the position by clicking on the respective Description button position on a respective record.
4. Click on respective Apply button to go to online application form (Refer Screen 2 below).
5. If there is any attachment regarding the vacancy, you can view it by click on View button of the attachment.
6. Enter your first name.
7. Then enter your last name.
8. Enter your full name.
9. Enter your address
10. Enter your contact number.
11. Enter your email address.
12. Specify date of birth by using the dropdown calendar.
13. Specify gender by using the dropdown list provided.
14. Select your nationality by using the dropdown list provided.
15. Select the country of residence by using the dropdown list provided.
16. Enter your Duty Station/Location.
17. Refer Education area to fill-up your education qualifications (Refer Screen 3 below).
18. Click on Add Qualifications button.
Once Add Qualifications button is clicked on, a page is loaded allowing you to provide your qualifications (Refer Screen 4 below).
19. Select qualification type by using the dropdown list provided.
20. Select qualification by using the dropdown list provided.
21. Enter university or institute of which you completed the qualification specified to the text field provided.
22. Select the year of completion by using the dropdown list provided.
23. Select the grade of your qualification by using the dropdown list provided.
24. If the qualification specified is one of your key qualifications, tick on the check box positioned against the Key Qualification field.
25. Click on Add Qualification button to save and add the qualification details provided.
Then, the main page of online application displays. Refer Education area of that page. (Refer Screen 3 below).
You can enter your qualifications one by one following the steps motioned above. Once you complete entering education information, move to the next section to enter information.
According to the online application, the next section is Language Skills area. (Refer Screen 5 below).
26. Select a language you need to specify using the dropdown list provided.
27. Specify the
28. Specify the Writing proficiency by using the dropdown list provided.
29. Specify the Speaking proficiency by using the dropdown list provided.
30. Click on Add to Grid button to save the record entered.
If you need to edit an
existing record, click on ![]() button of the respective record and do your
modifications. If you need to remove an existing record, click on
button of the respective record and do your
modifications. If you need to remove an existing record, click on ![]() button of the respective record.
button of the respective record.
Once you complete entering Language Skills information, move to the next section to enter information.
According to the online application, the next section is Work Experience area. (Refer Screen 6 below).
31. If you do not have work experience to be entered you can avoid this area without providing any information. If you need to enter work experience, first, tick on the check box of Experience field (Refer Screen 6 below).
32. First, click on Expand button to expand the work experience area (this area is collapsed by default). Then, it displays the information areas you need provide (Refer Screen 7 below).
33. Enter the moth and the year which you started a particular work experience.
34. Enter the moth and the year which you ended up a particular work experience.
35. Enter the respective organization you worked for during that period.
36. Enter the position you hold in that organization.
37. Enter the key responsibilities you handled.
38. Enter the experience of this organization in months and years.
Once you complete entering Work Experience information, move to the next section to enter information.
According to the online application, the next section is Current Work Details area. (Refer Screen 8 below).
39. Enter current salary to the text field provided.
40. Enter the salary expected in to the text field provided.
41. Specify the ‘From’ and ‘To’ dates of the notice period you need for your current job by using the dropdown calendars.
42. Specify ‘how did you get to know about this vacancy’ by using the dropdown list provided.
Once you complete entering Current Work Details, move to the next section to enter information.
According to the online application, the next section is Application area where you are allowed to attach certain files (Refer Screen 9 below).
43. If you have a letter of application to be attached, browse for the respective file by using the Browse button.
44. Once you browsed for the respective file, click on Upload button to upload the document to the application.
45. If you need to attach your CV, browse for the respective file by using the Browse button.
46. Once you browsed for the respective file, click on Upload button to upload the document to the application.
47. Click on the Add Referees button to add the details of the referees. (Refer screen 10)
48. Enter the referee’s name.
49. Enter the organization to which the referee is attached.
50. Enter the position held by the referee.
51. Enter the referee’s address.
52. Enter the referee’s contact number.
53. Enter the referee’s email address.
54. Click on the Add Referee button to save the details of the referee. Likewise you can add the details of the number of referees required.
If you need to edit an existing
record, click on ![]() button of the respective record and do your
button of the respective record and do your
modifications. If you need to
remove an existing record, click on ![]() button of the respective
button of the respective
record.
55. Click on the Back button to go back to the main application form.
56. Once you completed providing information to the application, click on Submit button to submit it.
|
PRE-REQUISITION(S) OF THIS PROCESS: ================================== 1.
Specifying the recruitment type (internal,
external or both) when making job requisitions for business unit(s) as
required in the section at Recruitment Module à Administration à Recruitment Activities à Create Requisition page. 2. Advertising positions as required in the section at Recruitment Module à Administration à Recruitment Activities à Create Advertisement page. |
Respective screens utilised by this process along with its field descriptions are discussed below.